Pages

Wednesday, October 31, 2012

Alice & Wonderland - Happy Halloween!!

HAPPY HALLOWEEN!  

Do you and your family get as excited about this holiday as much as we do?!!

So...Maybe we're a little over the top in some cases, but big deal!  I love everything not scary about Halloween.  From the party, to the planning, to the costumes, to the candy!  Oooh...the CANDY! Yes; I have to say...I love it all!!

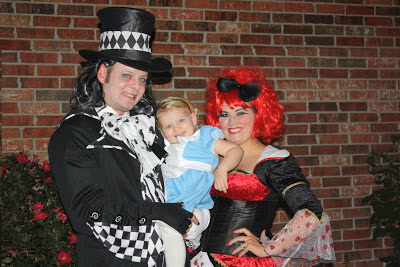
In past years, our family has gone with theme costumes, and this year was no different.  We went with the Alice & Wonderland theme this year, with the Mad Hatter, Alice, and the Queen of Hearts.  Afterall..."We're all Mad Here". Wa-ha-ha-ha-ha!

Image from society6.com


So Happy Halloween y'all!

Be safe trick or treating with your families, and if you're on the east coast, battling the remnants of Hurricane Sandy - We're still praying for you!

Happy Wednesday & a Happy "Very Merry UnBirthday to you!" ;)


Tuesday, October 30, 2012

Menu Tags

Here is a menu I created about a year ago.  The inspiration came from this pin I saw on Pinterest around that time. 

I loved the bright colors of Yellow with the pops of Green and Red, so I was on a mission to make my own.

This menu has been great for our family over the last year, but the menu items were starting to become a hassle.

I had made up and printed out menu tags with a rotation of items we go through on pretty paper, but over time, I realized that sometimes I want to make something that isn't printed, and they weren't laminated, so I always had to be cautious as to where I was sitting my menu tags.


To this day, I still don't have a laminator.  So I took the color of construction paper I wanted and covered it with a page protector and created my menu tags that way.

Today, my menu planning is easy and simple. I just mark the menu tag with my items for the next two weeks, and when the time comes, they easily wipe off with a dry erase pad.

Did you know they even make dry erase markers with erasers and magnets already built in.  Yep!  They're really nice!


So there you have it.  My little tip to make every day life a little simpler.

Do you plan a menu?  Do you do a monthly, bi-weekly, or weekly rotation?  Do you have any helpful tips to share?  As always, I love to hear your feedback.

Happy Planning,


Thursday, October 25, 2012

Kids Pumpkin Crafts - Glitter & Spidey Pumpkins

We really had such a great time putting this together.  The best parts were watching my girl make a *monster*ous mess of glitter glue on top of her pumpkin, but her stuffing the spider legs was my absolute fav!

She gets this "Must Concentrate" look on her face that is to die for!

I also loved seeing her aspect of how things should look.  Which by the way, she really surpassed my expectations as to what and how much she would do.  For some reason, I didn't think the spider craft would be too advanced for some reason, but it wasn't.  At all.

I think you're kiddo's will really enjoy this too!  So let's get started...

You'll Need:

Glitter Pumpkin:
Glitter Glue or White Glue (I found the glitter glue kept her more focused)

Additional Glitter
Pumpkin

Spider Pumpkin:
Googly Eyes
Black Pipe Cleaner
Pen/Pencil

We also did a marker one, which was really fun, but I don't have pics of that downloaded just yet.  Just throwing that out there in case any of you want/need more ideas :)

Basically all we did, was head outside.  Can't really screw anything up out there, so luckily the weather was cooperative. :)

Just like in my last kids craft post, I just sat everything out in front of her for each project and let her go to town.

For the glitter pumpkin, we started with white glue, which was fun, but WOW the glitter glue, really colored her world!  Highly recommend!! 

Then I sat out my glitter shakers, let her choose the additional colors she wanted to add, and viola.  Her Glitter Pumpkin was born!

Zombie Mode: Must concentrate

"Pretty as a pumpkin" BAHAHAHA I make myself laugh! ;)

For the spider pumpkin...Mom/Dad...you're in charge/supervision of Step 1. Take your pumpkin, and around each of the grooves, take your pencil/pen, and insert it into the pumpkin to create a hole for your pipe cleaner to go in for the spider legs. 
Mark the spot for the legs, making the hole big enough for the pipe cleaner to go into.  I used a ball point pen.  Worked great.
Insert the legs.
Completed legs
Attach your googly eyes - I laid out 8, but she only wanted 6...

and her Pumpkin Spidey, turned out absolutely great! 

Her Pumpkin Spidey now lives on our window seal for everyone to see as they drive by. 

Have a Great Day, Pumpkin's :)


Wednesday, October 24, 2012

Starbucks (Smarbucksty) "Skinny" Pumpkin Spice Latte - Copycat

This recipe is legit.  Skinny or not!

Let me just start by saying, I'm not a coffee drinker, but something about hearing Pumpkin Spice Latte, a million and one times a day, got me thinkin'..."This stuff must be really good", and WOAH baby...it is!


With my new found latte love, a whisk, and some determination, I started mixing around in my kitchen to see if I could mimic these tasty little treats.  Well, I tell you what...I came pretty close, but something about mine still wasn't quite right.  It was still drinkable, but didn't have that rich factor to it, that made the drink, THE DRINK.  Um-Kay...


So I turned to the internet to see what was out there.  Believe it or not, there are TONS of these recipes, but of the ones I tried, this one's the keeper!

By the way, if any of you are wondering, what I was missing? It was Half n' Half & Brown Sugar.  Doh!  Milk does a pretty good job alone, but the half n' half really brings a yumminess factor it!

If you have a pumpkin spice latte addiction too;

You'll Need:
(XL recipe) 
A very tall coffee cup or glass
1c. milk (any %)
2 tsp. of canned pumpkin puree
1 tsp. of brown sugar
1/2 tsp. pumpkin pie spice (I prefer just shy of 1/2tsp)
2 tsp. vanilla extract
2c. very strong coffee (the stronger the better)
4Tbsp. Half n' Half
2 tsp. white sugar
whipped cream for topping

To get started, you'll begin my making your pumpkin milk.  You'll need a microwaveable measuring cup.  Measure your milk, pumpkin, brown sugar, vanilla, and pumpkin spice, then microwave for 2 minutes.  As RecipeGirl stated in her directions, you'll want to make sure to remove it when the milk is hot & frothy.  Pour your pumpkin milk into a tall cup, then add hot coffee, then cream. Add white sugar, stir, and taste. Add more sugar, if desired. I REALLY loved mine with 3tsp. of white sug!!

Top your homemade latte with whipped cream, and celebrate that you can have Pumpkin Latte's Year Round! *Happy Dance, Happy Dance*
By the way - Another fantastic tip that RecipeGirl provided, is how to make your own pumpkin spice if its not readily available in your area. She says to "mix equal parts of cinnamon, ginger, allspice and nutmeg- and measure from there."  Genius, I tell you.  Genius!

Cheers!


Tuesday, October 23, 2012

Crock Pot Chicken Noodle

Holy Cow!  Not kidding, this reminded me of my Granny's Chicken and Noodle without all the hassle of messing with the dang whisking, pouring, and clumping of cornstarch. *Heaven, Earth, and the Angels Sing!*
 

If I may be so bold - You're flipping crazy, if you don't give this recipe a try!

You'll Need:
(My half recipe - Feeds 4)

2 bnls chicken breasts
1 can of cream of chicken
3 Tbsp. butter/margarine
24 oz. chicken broth/stock
1 small bag of Frozen Egg Noodles
Salt/Pepper

Toss the gang into your crock pot (excluding the noodles) and cook on low for 6-7 hours.
After 7 hours, your mixture will look like this
Take your chicken out and shred it.  I used one fork.  Very tender.  Fell apart to the touch.
Add in your frozen noodles.  I used Reemes.  Give it a quick stir.  
Return the lid, flip the crock to high, and walk away for 30 min's to an hour, and BAM - Homemade Chicken Noodle.  Yum - O!
 
Can't wait to make this one again.  It will be in our monthly rotation!


Monday, October 22, 2012

Tomato Cage Witch Hats

Looking for some fun Halloween Decor, but don't want to break the bank?  You came to the right place!

Today I'm going to show you how I pieced together these Witch Hats using items that will come from your gardening shed, sewing basket, and the Dollar Store.  Wee...
Come join me, and let's create!

Today;

You'll Need:

Tomato Cage(s)
Weed Fabric
Scissors
Zip Tie(s)
Straight Pins
Sharpie
Duct Tape
Electrical Tape
Wire Ribbon
2 ceiling tiles (Ok...You got me.  Not from $ Store.  It's better! Home Depot - 38 cents - Holla!)
Sheetrock Saw or Razor blade
Spray Paint
Wire Clothes Hanger(s)
Spooky Spider(s)

To begin, you'll bend all 4 feet of the tomato cages, tip to tip, in the center to create a triangle affect.  Wrap a zip tie around the feet, and here's your base.

If you so desire, wrap with duct tape as well.  Only one of my cages got this, as it was an after thought :)
To begin building the hat, drape your weed fabric barrier over the entire cage, leaving additional length on each side to tuck into the bottom, before you cut.  My rule of thumb, is it's better to have too much, than not enough.  So I left approximately 12-15".
Now you should have one droopy looking mess, but it gets better, fairly quickly.
Here's where an assistant is most helpful.  I had help with my 1st one, and was on my own for the second.  If you're on your own, words from the wise is to do prep ahead of time.  I had several medium size duct tape pieces, pre-cut, so that I could just grab and go.  It was really helpful, so  unless you have a Vanna White, remember this tip.  It will save you some frustration.

Continuing on with the hats...

Flip the Tomato Cage upside down, so it is sitting on the triangle tip you created.
Start folding the fabric down around the metal of the cage base, and duct tape around the bottom as you go. 

Don't worry about the sides not being pieced together yet...we'll get to those later, and don't try to skip ahead and think doing the sides 1st is easier.  It's not.  I tried it.  About 12 times. :) :) :)
Notice how the duct tape in secured on the tape and the metal itself.  Very important. 
When the base is duct taped all the way around, use a sewing pin, to connect the 2 fabric sides together. See how they overlap here.  That's where you pin.
 
Sit the base of the cage, on the ground, grab your sewing pins, and start on your sides.

The idea here, is to tuck the fabric in and wrap it around just like you would a present.  Once the fabric is in the proper placement, pin down the sides...
 
To pin: Use the cage as a guide.  Where the bars go cross ways, that's where you'll put the pin in.  So pin just above the bar.  If you go directly behind the bar, it helps the pin go straight into the bottom piece of the fabric.  In my mental state, this made me feel like I was building a fairly awesome structure, and like maybe I should be an architect some day.  I think maybe I'll stick to my day job ;)
 
So now that the sides are pinned, I'll show you a neat little trick that I use for all sorts of stuff...It requires a SHARPIE! I love these things...Such an easy way to hides those bright colors that we want hidden, and takes all of 3 seconds.
Color your straight pin heads.  Completely optional but blends in perfectly if you do

Now that the sides are pinned, your hat should look like this from the outside...
Hey...I never claimed to have superior wrapping skills :)
and like this from the bottom, into the cage.


I chose to also add electrical tape to the tip of the hat, so the legs wouldn't poke through the fabric.
Time for the base of the hat.  I have to be honest here, this was a mess, so don't do this in your Sunday best...

Using a black marker, I drew on a circle.  Using sheet rock saw, I cut it out following my stencil.  
  
 After your circle is cut.  Spray paint it black.


Now it's time to fancify these wicked cutie's...

I took apart a wire clothes hanger (using a pair of pliers), shaped it, and wrapped the non-hook end of it around the tip of my hat, then pinched it taut with the pliers. 
With the hook end, I stuck my styrofoam spider onto it for additional support.


For the bow...
I used wired Halloween ribbon.
For the bow around the hat, I went up approximately 6" up from the base, and tied a bow (like you would tie your shoes) and fluffed it out.

And there you have it folks...

Spookey Ookey Hats, that's sure to please your Halloween Crowd (or passer by'ers)!


Friday, October 19, 2012

The Artful Year - My Autumn Crafts EBook!


Have you seen or heard of The Artful Parent's - My Autumn Crafts EBook!?! If you haven't you're really missing out on something special this fall. 

I've seen and heard this trickling around a few places now, but it hit me like a ton of bricks when I saw it on Momma Harvey's page where she mentioned it here and here, then today while rummaging through Facebook, I found a wealth of information, but more on that in a sec.

This book is stuffed full of wonderful arts & crafts you can do with your kiddo's.  The bonus? It's all combined into one little place, so it's great to come back to reference for future years to come.  How fantastic! 

You wouldn't think it couldn't possibly get any better than that, right?  Well...you'd be wrong!

Today, through October 22, 2012, Jean Van't Hul, The Artful Parent, is having "A Pay What You Can Sale".  Say Whaaa???  Is she MAD?!?!!  *Shugs Shoulders* Must be! ;)

All I can say, is take full advantage of this sale while it lasts, and  please be truthful about what you can and can't provide.  This ebook is absolutely beautiful, and I promise you when I say "You won't be disappointed" that you won't be! 

To sum things up, take advantage of this fantastic offer.  Otherwise, you'll be regretting it when the kids are coped up, stir crazy, in the house, driving you mad, and all you want is a little peace & quite, and for them to "Turn that TV down!"

Not that I'd know from experience of anything... ;)

SO...what are you waiting for?


Game Day Sliders

Good Mornin'.  The weather is awesome here today!

To start the mornin' off right, I wanted to share with you an awesome "Go To" Game Day recipe.  Game Day Sliders.  Oh.Yum...

My husband flips over these, and I'm willing to bet, your guys will too!!

You'll Need:
1# Ground Beef with all the fixin's
Sliced Cheese
Spoon/Mellon Baller

Combine your hamburger meat with all the fixin's you like in your typical hamburgers.  We throw in breadcrumbs, worshey sauce, green onions, sometimes liquid smoke, and Webster's "Gourmet Hamburger Seasoning".  It's Yummy!

Before you get too messy, go ahead and turn a large skillet to Medium Heat on your stove.

With your hands, combine all your ingredients.
 
Using a 1" melon baller, start dishing up your patties. (You can easily use your hands or a spoon here, if you don't have a melon baller.  Don't let the technicalities throw you off here.:)) Then put them in the hot pan.

After they're cooked on one side (about 3-5 min's depending on thickness) flip them over, and press down with your spatula to get more of the hamburger look.
Once they're finished on this side, add your cheese
Place on your skillet lid for quick melting
Remove after 20 seconds and witness some pretty miraculous cheesy sliders.
Add to a dinner roll for a bun (we used yeast rolls). 
Top with condiments and take a bite outta crime. I mean prime.  Hehe ;)


Thursday, October 18, 2012

Kids Halloween Craft - Pumpkins for my Punkin'

Per tradition, we started on a fun Halloween Craft the other night.

My 2 year old, had so much fun!  You could tell she had such a sense of self accomplishment completing these all by herself (with supervision).

She really seems to enjoy creating different things, so this was a fun outlet for her to create whatever she wanted, and it can be for your kiddo's too!

The great thing about this project is you can literally use whatever you have on hand to make these.  Construction paper, poster board, you name it.  Just let the kiddos have fun with it, and trust me, you'll be the one reaping the rewards! :)


So let's get started shall we?

You'll Need:
A surface.  We used foam pumpkins
White School Glue
Googly Eyes
Pom Pom's
Whatever you've got in your craft stash - Get creative!

I like to start our activities by laying out various items that she can easily handle, and allow her to reach for whatever she wants to add to the pumpkin.

We used Googly eyes and Pom Pom's. She was in heaven.


I can't tell you how PROUD she was of her creations!

What kinds of crafts do you and your children like to create for Halloween?  I'd love to hear your traditions!