Pages

Showing posts with label Halloween Crafts. Show all posts

Thursday, October 10, 2013

Pumpkin Day! Crafts, Recipes, Hairbows and Creative Pumpkin Decorating Ideas

As a Mom, I love, love, love, looooove the Family Fun Magazine!

I knew as soon as I saw this picture in our magazine this month, that I would have to post about it.
Since I've dubbed today, "Pumpkin Day", here at Crafty Momma, today seems like the perfect day to share it.

If you too, are looking for fun and creative ways to decorate your pumpkin, check out the rest of the cuuuuuute decorating ideas Family Fun has to share with you.

I'm betting you'll be saying "Awe" and "Oh...that's so easy" and "Why didn't *I* think of that"

If you missed how Pumpkin Day was started, here's a glimpse:


Miss our Facebook chats today?
No problem...Catch a glimpse below for some more Pumpkin-y Fun Ideas!

Pumpkin Spiced Latte Junkies - Need Apply - Get your Starbucks Pumpkin Spice Latte Copycat Recipe here - Smarbucksty "Skinny" Lattes on the CHEAP!

Kids Crafts - Pumpkins for my Punkin'

Mommy Crafts - Pumpkin Hairbows for Girls

Kids Crafts - Glitter and Spidey Pumpkins

Family Crafts - Creative Pumpkin Decorating Ideas

If you have some of your own ideas you'd like to share, I'm all ears...
Fall is on and we need our PUMPKIN fix!


Wednesday, February 13, 2013

Bacon Rose Bouquet

Let me start off by saying that I wasn't originally going to post this.
I found the idea on Pinterest, BUT, after posting my final creation on my personal Facebook page, I received so many responses with compliments, questions, and "Will I make them one?"

As you can see, they were all welcomed responses, so I figured this is a service you all NEEDED to be provided with!

Now...apparently, I didn't read through the whole PIN on my pinterest board.  I just thought they were cute and did them.

After having several people ask me if I ruined a muffin pan creating them, I was like "Huh?"
The original PIN says you need to drill holes in a muffin pan.
While that's creative, there is certainly no need to do that.


Now...I do not have step by step pictures, because like I said, I was not planning on doing a blog post on this.  However, I will try my best to provide you all with as much information as I can since tomorrow is V-day and this would be absolutely presh to give your man!

I did go back through and try to take some snap shots of dissecting your flower pieces. That and how to build the roses were by far the most popular questions.  Again, I will do my best to explain, but feel free to comment or ask questions.

Let's start.

You'll need:
1 package of bacon - Whatever flavor you like.  (Note - I have not used turkey bacon.  Let me know if you try!)
1 faux flower bouquet
toothpicks
cookie sheet with lip - I used a jelly roll pan
foil


To start; begin by taking off your faux flower heads off the stems.
Most come off with a gentle tug, but the reenactment, which will hopefully benefit some. FYI: I did not do a reenactment of the roses.

Gentle Tug

Flower Detaches from steam

Pull Plastic Nub Piece Out, Remove Flower

Reattach the Nub to the Greenary

And there you have it.


Alright - Time for bacon!
Preheat your oven to 350.
Line your cookie sheet with foil.
Lay your bacon out flat. (I worked right on the cookie sheet)
Roll bacon into a spiral, keeping it nice and tight. Fat side of bacon will be on the bottom.
Tip: One thing I wished I would have done was focus more on the bottom of the "rose"  make sure it stays nice and tight.  I found that they're not easily transported if the bottom (the fatty side) doesn't have a nice "seal" (I guess we'll call it) on the flower steam.  Mine stayed fine for presentation purposes, but I wouldn't have wanted them to ride solo in the passenger seat of my car.
Fat side (bottom) you will secure with toothpicks in a criss-cross fashion.  I put one closer to the bottom and one right through the middle.
Continue same steps with the remaining pieces of bacon.
Tip:  If you plan to use just the amount of bacon you need - I highly recommend doing a couple extra's in case some look better than the others.
Cook bacon for 20-25 mins or until cooked through.
Let the bacon cool before handling.  About 5 min's.
While you're waiting for the bacon to cool, grab your vase and your stems.
Tip: If you're doing a small bacon bouquet, like I did, I couldn't find a vase small enough to hold them upright, so choice to use a decanter.  Worked fabulously!
Once bacon is cool, attached the individual pieces it to the tops of the stems, and Present.

I gave this to my husband for our 10 year.
His reaction?  At 1st he thought they were real flowers!  He had to do a triple look!!
A week later, he is still talking about these and even told the girls at work, they  needed to do one for their husbands.  I'm going to go out on a limb here and say he liked it ;)

I know the men in your life will too!

Enjoy,


Monday, November 19, 2012

Pumpkin Hair Bow


This is one of the fall hair bows I made for the girls in my life.  I'm a little late in posting, but since it's almost Thanksgiving, it's really perfect timing, if you think about it! 


So let's get started, shall we?


You'll Need:
12 pieces of 3/8" Curled Orange Crossgrain Ribbon 
2 pieces of 3/8" Curled Green Crossgrain Ribbon
1"x 1" piece of brown satin ribbon
Heavy Duty Needle
Thread
Scissors
Ruler

Lighter or Fray Away
Hot Glue Gun, Glue
Alligator or French Barrette Clip

To start, you'll need to curl your crossgrain ribbon.  If you've never done this before, it's simple enough, just follow these easy instructions.

Once your ribbon is curled, you will want to take them off the dowel rods and sit aside for them to be cut down.

With your ruler or cutting mat, measure your ribbon down into 3" pieces. Cut.
You will need approximately 12-15, 3" pieces/bow.
Once all your pieces are cut, heat seal your ends. This is just quickly running your lit lighter across the ends of your ribbon.  Make sure when you do this, you're doing it in a sweeping type motion, so you don't catch your ribbon on fire.

Now it's time to thread your needle.  Every bow designer is different, but I like to thread my needle and (triple) knot the end when making my korker bows.  I just always make sure to leave ample room to sew the bow together.  I typically leave about 18" hang, which will leave me with plenty of thread to swipe the needle through the center of the "pumpkin" several times for maximum hold.

Let's start building the pumpkin now.  Once your needle and thread is prepared, you will measure the true center of each piece of ribbon and where the center point is, that is where your needle will go.  You can see a full "how to" here

Place the middle (center) of your ribbon directly down into the needle.  

DO NOT MOVE, PULL, OR DO ANYTHING WITH THIS HAND UNTIL YOU ARE FINISHED ADDING ALL THE PIECES OF THE PUMPKIN!

As you are adding pieces to your needle (again, do not pull the needle through any of the pieces just yet), you will want to stagger the pieces as you go.  Think of it as a clock.  Start at 12, make your way to 1, then 2, then 3, etc., as you add them to your needle.

You will have to cinch the pieces down as you go, as your needle is only so big.  It sounds much harder than it is, trust me.  Oh and don't worry about hurting the ribbon.  My 2 year old tugs at hers all the time and is still in perfect condition.

Okay, so once all your pieces are positioned/staggered the way you want them, add your 2 green pieces in a cross fashion across the top.  These will be your leafy steams.

Now it's time to feed the needle all the way through the layers.

With your opposite sewing hand, pinch the center together and hold it taut.  Feed the needle all the way through, keeping the center pinched, so the ribbon doesn't move around.  To feed it all the way through, you may want/need a hard surface for this. The ribbon is quite strong once you get so many layers.

Now you just continue to feed the needle through the front and back as you normally would when sewing.  I like to criss-cross the stitching as I go.  Once you are close to the end of your thread, make sure the needle is going through the back side of your bow.  This is where you will snip the thread from the needle and triple knot it.

Now for the stem.  Take 1, 1"x1" piece of brown satin ribbon and fold it in half (Sealing with glue), then in half again to create the perfect "Stem".

With a small dab of hot glue, insert the glue into the center of your bow between the green leafy steams, and place your brown stem in place.

There you have it...The most adorable pumpkin bow you'll find this side of town!


Wednesday, October 31, 2012

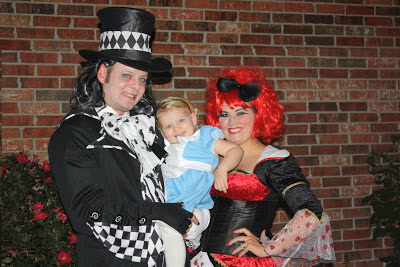
Alice & Wonderland - Happy Halloween!!

HAPPY HALLOWEEN!  

Do you and your family get as excited about this holiday as much as we do?!!

So...Maybe we're a little over the top in some cases, but big deal!  I love everything not scary about Halloween.  From the party, to the planning, to the costumes, to the candy!  Oooh...the CANDY! Yes; I have to say...I love it all!!

In past years, our family has gone with theme costumes, and this year was no different.  We went with the Alice & Wonderland theme this year, with the Mad Hatter, Alice, and the Queen of Hearts.  Afterall..."We're all Mad Here". Wa-ha-ha-ha-ha!

Image from society6.com


So Happy Halloween y'all!

Be safe trick or treating with your families, and if you're on the east coast, battling the remnants of Hurricane Sandy - We're still praying for you!

Happy Wednesday & a Happy "Very Merry UnBirthday to you!" ;)


Thursday, October 25, 2012

Kids Pumpkin Crafts - Glitter & Spidey Pumpkins

We really had such a great time putting this together.  The best parts were watching my girl make a *monster*ous mess of glitter glue on top of her pumpkin, but her stuffing the spider legs was my absolute fav!

She gets this "Must Concentrate" look on her face that is to die for!

I also loved seeing her aspect of how things should look.  Which by the way, she really surpassed my expectations as to what and how much she would do.  For some reason, I didn't think the spider craft would be too advanced for some reason, but it wasn't.  At all.

I think you're kiddo's will really enjoy this too!  So let's get started...

You'll Need:

Glitter Pumpkin:
Glitter Glue or White Glue (I found the glitter glue kept her more focused)

Additional Glitter
Pumpkin

Spider Pumpkin:
Googly Eyes
Black Pipe Cleaner
Pen/Pencil

We also did a marker one, which was really fun, but I don't have pics of that downloaded just yet.  Just throwing that out there in case any of you want/need more ideas :)

Basically all we did, was head outside.  Can't really screw anything up out there, so luckily the weather was cooperative. :)

Just like in my last kids craft post, I just sat everything out in front of her for each project and let her go to town.

For the glitter pumpkin, we started with white glue, which was fun, but WOW the glitter glue, really colored her world!  Highly recommend!! 

Then I sat out my glitter shakers, let her choose the additional colors she wanted to add, and viola.  Her Glitter Pumpkin was born!

Zombie Mode: Must concentrate

"Pretty as a pumpkin" BAHAHAHA I make myself laugh! ;)

For the spider pumpkin...Mom/Dad...you're in charge/supervision of Step 1. Take your pumpkin, and around each of the grooves, take your pencil/pen, and insert it into the pumpkin to create a hole for your pipe cleaner to go in for the spider legs. 
Mark the spot for the legs, making the hole big enough for the pipe cleaner to go into.  I used a ball point pen.  Worked great.
Insert the legs.
Completed legs
Attach your googly eyes - I laid out 8, but she only wanted 6...

and her Pumpkin Spidey, turned out absolutely great! 

Her Pumpkin Spidey now lives on our window seal for everyone to see as they drive by. 

Have a Great Day, Pumpkin's :)


Monday, October 22, 2012

Tomato Cage Witch Hats

Looking for some fun Halloween Decor, but don't want to break the bank?  You came to the right place!

Today I'm going to show you how I pieced together these Witch Hats using items that will come from your gardening shed, sewing basket, and the Dollar Store.  Wee...
Come join me, and let's create!

Today;

You'll Need:

Tomato Cage(s)
Weed Fabric
Scissors
Zip Tie(s)
Straight Pins
Sharpie
Duct Tape
Electrical Tape
Wire Ribbon
2 ceiling tiles (Ok...You got me.  Not from $ Store.  It's better! Home Depot - 38 cents - Holla!)
Sheetrock Saw or Razor blade
Spray Paint
Wire Clothes Hanger(s)
Spooky Spider(s)

To begin, you'll bend all 4 feet of the tomato cages, tip to tip, in the center to create a triangle affect.  Wrap a zip tie around the feet, and here's your base.

If you so desire, wrap with duct tape as well.  Only one of my cages got this, as it was an after thought :)
To begin building the hat, drape your weed fabric barrier over the entire cage, leaving additional length on each side to tuck into the bottom, before you cut.  My rule of thumb, is it's better to have too much, than not enough.  So I left approximately 12-15".
Now you should have one droopy looking mess, but it gets better, fairly quickly.
Here's where an assistant is most helpful.  I had help with my 1st one, and was on my own for the second.  If you're on your own, words from the wise is to do prep ahead of time.  I had several medium size duct tape pieces, pre-cut, so that I could just grab and go.  It was really helpful, so  unless you have a Vanna White, remember this tip.  It will save you some frustration.

Continuing on with the hats...

Flip the Tomato Cage upside down, so it is sitting on the triangle tip you created.
Start folding the fabric down around the metal of the cage base, and duct tape around the bottom as you go. 

Don't worry about the sides not being pieced together yet...we'll get to those later, and don't try to skip ahead and think doing the sides 1st is easier.  It's not.  I tried it.  About 12 times. :) :) :)
Notice how the duct tape in secured on the tape and the metal itself.  Very important. 
When the base is duct taped all the way around, use a sewing pin, to connect the 2 fabric sides together. See how they overlap here.  That's where you pin.
 
Sit the base of the cage, on the ground, grab your sewing pins, and start on your sides.

The idea here, is to tuck the fabric in and wrap it around just like you would a present.  Once the fabric is in the proper placement, pin down the sides...
 
To pin: Use the cage as a guide.  Where the bars go cross ways, that's where you'll put the pin in.  So pin just above the bar.  If you go directly behind the bar, it helps the pin go straight into the bottom piece of the fabric.  In my mental state, this made me feel like I was building a fairly awesome structure, and like maybe I should be an architect some day.  I think maybe I'll stick to my day job ;)
 
So now that the sides are pinned, I'll show you a neat little trick that I use for all sorts of stuff...It requires a SHARPIE! I love these things...Such an easy way to hides those bright colors that we want hidden, and takes all of 3 seconds.
Color your straight pin heads.  Completely optional but blends in perfectly if you do

Now that the sides are pinned, your hat should look like this from the outside...
Hey...I never claimed to have superior wrapping skills :)
and like this from the bottom, into the cage.


I chose to also add electrical tape to the tip of the hat, so the legs wouldn't poke through the fabric.
Time for the base of the hat.  I have to be honest here, this was a mess, so don't do this in your Sunday best...

Using a black marker, I drew on a circle.  Using sheet rock saw, I cut it out following my stencil.  
  
 After your circle is cut.  Spray paint it black.


Now it's time to fancify these wicked cutie's...

I took apart a wire clothes hanger (using a pair of pliers), shaped it, and wrapped the non-hook end of it around the tip of my hat, then pinched it taut with the pliers. 
With the hook end, I stuck my styrofoam spider onto it for additional support.


For the bow...
I used wired Halloween ribbon.
For the bow around the hat, I went up approximately 6" up from the base, and tied a bow (like you would tie your shoes) and fluffed it out.

And there you have it folks...

Spookey Ookey Hats, that's sure to please your Halloween Crowd (or passer by'ers)!


Thursday, October 18, 2012

Kids Halloween Craft - Pumpkins for my Punkin'

Per tradition, we started on a fun Halloween Craft the other night.

My 2 year old, had so much fun!  You could tell she had such a sense of self accomplishment completing these all by herself (with supervision).

She really seems to enjoy creating different things, so this was a fun outlet for her to create whatever she wanted, and it can be for your kiddo's too!

The great thing about this project is you can literally use whatever you have on hand to make these.  Construction paper, poster board, you name it.  Just let the kiddos have fun with it, and trust me, you'll be the one reaping the rewards! :)


So let's get started shall we?

You'll Need:
A surface.  We used foam pumpkins
White School Glue
Googly Eyes
Pom Pom's
Whatever you've got in your craft stash - Get creative!

I like to start our activities by laying out various items that she can easily handle, and allow her to reach for whatever she wants to add to the pumpkin.

We used Googly eyes and Pom Pom's. She was in heaven.


I can't tell you how PROUD she was of her creations!

What kinds of crafts do you and your children like to create for Halloween?  I'd love to hear your traditions!


Tuesday, October 9, 2012

Spider Hair Bow (Itsy Bitsy's too!)

Morning Y'all...How was your Monday?

Mine was great.  I'm kind of a odd duck, in that way. I actually enjoy Monday's.  It's a fresh start to the week - a clean slate!  This is weird to most - I know!! ;)

As a lot of you saw; Yesterday was our kick off to some fun Halloween crafts I have coming up...So, today, I just had to share this darling spider bow with you!! Aren't these guys just the cutest?!!


You won't want to miss out on this tutorial, so lets grab your supplies, and get ready!!!

Today...

You'll Need:
3/8" Black Grosgrain Ribbon
3/8" Red Grosgrain Ribbon
Googly Craft Eyes
Marabou
Scrap of felt fabric
Needle/Thread
Hot Glue Gun/Glue Sticks
Lighter
Clothespin

Got your supplies?  Okay, lets get started!

1st - You'll want to curl your black ribbon.  To do this, please follow the easy instructions here.

After you have taken your ribbon off the dowels, you will set 4 pieces of (~12") ribbon (per spider) off to the side.  If you are creating the baby version of these cuties, you will cut the ribbon into 3rd's, and will still need 3, 4" pieces...

After all pieces have been cut, take your lighter, and slightly run them along the ends of the ribbon, making sure not to catch them on fire!  It just takes a quick swipe.  This method heat seals the ends, so that the ribbon will not fray.

Next, we're going to build the base.  The Legs.

With your needle and coordinating thread, thread your needle.  You will need at least 18-24" of dangling thread to complete this project. (It is ok to knot the end of your thread - I typically triple knot it.)

Once you're needle is prepared; Hold the lower middle of the needle and measuring to the center of your ribbon piece (for instance if you're using a 12" piece, the center will be 6" and so on) and place the middle directly down into the needle.  
DO NOT PULL THE THREAD THROUGH AND DO NOT MOVE YOUR HAND!!!!!!!  In fact, you might as well get comfy, because you're going to be here for a short bit.


Repeat the above steps, for all 4 pieces, staggering as you add them to your needle.
Once all your pieces are positioned the way you want them, cinch them down on the needle, holding the needle still with your right hand, and finish feeding the needle all the way through the layers.

Feed the needle through without pulling it all the way through.  You may have to scrunch your ribbon together to see the needle.


Pull the thread tightly, then feed the thread back through - going the opposite direction. So your sewing the middle together...
Continue sewing until the body is firmly supported.
Once you have finished sewing; Your body should look like this:


Before we move onto the body, now is a good time to plug in your hot glue gun.

Moving onto the body...

For the body, I used marabou.  Ever heard of it?  It's this lovely frizzy mess of fun that they make boa's out of! 

For the large spiders, measure out 5" of marabou, for the small, measure out 3".

Large Spider
Itsy Bitsy Spider
Now it's time to grab your scrap piece of fabric.  It doesn't need to be very large.  

Fold your cut marabou piece in half, so the ends are together.  On top of a scrap piece of paper, place a small amount of glue on your scrap fabric, and place the marabou ends into the glue, squeezing the scrap fabric sides up to get a good seal.
Make sure you pinch everything into the glue, so the pieces seal together.  
If you have questions, feel free to ask!
This is what the backside of your body should look like:
To continue gluing the body, you'll separate the middle of the body, and put a small amount of glue on the lower piece (where my thumb is). 
Using a clothespin or other object, press the marabou together for a few seconds so it can dry. 

Okay...so, now it's time to piece the body and legs together:

Place a small amount of glue on the lower middle of the body, then place the body on top, and firmly press into place.  I use a clothespin to speed things along.

By the way...I do not recommend using your hands here.  
Trust me...When I say "You'll burn yourself" :)
Let the hot glue dry for about 30 seconds, then place on your googly eyes...

This is what your spiders should look like...

Large:


Itsy Bitsy:

Scary little critters, aren't they?! 

Now...IF you know me, you know I'm all about the bling and the bows, so how could any spidey gal go without a bow herself? My thoughts exactly!

For the itsy bitsy hair bows:

Measure 5" of another color of ribbon.  I used red ribbon to mimic a black widow.  OoOoOOo...Scary! ;)
Don't forget to heat seal your ends.  
Now, thread your needle and thread.  Once again in coordinating colors.  You'll want approximately 10-12" hanging from your needle.  Go ahead and snip the thread, and tie into a double knot.  Sit aside.

Take your ribbon and fold the ends to cross each other.  
Holding the middle into place, take the top loop and press it into the back side of the bow to create a smaller bow.  
With your needle and thread, sew the center of the bow, going through the front and the back at least twice, then in a winding clockwise motion, spin the thread around the bow to create a complete center.  Once you get to having about 3" of thread left, go back through the front center of the bow.
Now, you'll need to turn your bow around and snip the thread that's attached to the needle, and double knot.

With your hot glue, put a small amount on the backside of your bow and attach to the spider, by pressing firmly into place for a few seconds.
All you have left to do is attach your alligator clip. 
This is what you're finished product(s) should look like:


Here is one of my friends daughter, sporting the Itsy Bitsy Spider.  
She is absolutely precious!!

 Oh Happy Day!