Sometimes I surprise myself when I sit down to make my bow creations. I'm not saying that in a braggish sort of way. Just in a way, that you never really know how good (or bad!) something is going to turn out until it's finished, and I'm pleasantly surprised with these. :)
So far, this is the only bow (outside of Santa) that my daughter begs to wear. She has 2, one for each piggy tail, and she named her elves Judy and Emily. :)
To start on your darlings bows;
You'll Need:
3/8" Grosgrain Cream Ribbon
3/8" Grosgrain White Ribbon
3/8" Grosgrain Green Ribbon
3/8" Grosgrain Red Ribbon
3/8" Grosgrain Ribbon in the color of hair you'd like to use. I was making multiple ribbons for the girls in my life, some were blonde (gold) and others brunette (chocolate brown).
Tiny Santa Hats (found mine at Hobby Lobby)
Mini Jingle Bells, Optional
Puff Paint, Optional
Scissors
Lighter (to seal)
Wooden Skewer, optional
To begin, as always plug in your glue gun, so it's hot and ready when you are.
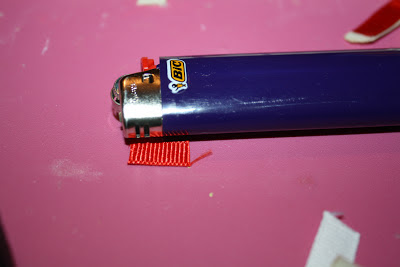
Next, cut 3.75" of your cream ribbon for the body. Since my daughter was "helping" me make these, these are all guestimation on measurements, but they're all pretty close, I'd say. Below you'll see that I use my lighter as a reference, so you can see 1st hand what it should look like.

Heat seal your ends.
Next, we'll create the face of your elf. It's simple enough. Just wrap the ribbon around your finger or thumb to create a loop.
Place a small amount of glue where you want to secure the face and sit aside.
Now, we'll move onto the arms. Cut 3.25" of your cream ribbon, and heat seal the ends.
Fold the "arms" at an angle, and seal with glue in the middle, so your image looks like this:
Then top and glue the body
Cut red ribbon to size for sleeves and heat seal the ends
Just like you did for the arms, fold the shirt at an angle, and seal with glue in the middle, so your image looks like this:
Attach the sleeves to the arms with glue
Cut and seal the middle of your shirt:
Attach to the middle of the shirt:
Let's move onto the skirt...Created 3 loops. You'll start with a "V", and make one loop directly in the middle. Then attach your skirt to the body directly under the shirt.
Cut 2 pieces of white ribbon for the legs approximately 2.5" each and heat seal.
So they resemble legs, I cross them a bit at the top and seal with glue before attaching the "legs" to the "body".
To attach the pieces, flip over the body, and attach to backside
Moving onto the tights.
I couldn't find candy cane striped ribbon in the uniform I wanted, so I opted to use puff paint. I love how it brought a different texture to the bow, and overall it turned out really great.
When working with puff paint, allow your paint to fully dry before moving forward with your bow. I highly recommend overnight.
Another thought, is to use a sharpie if you're in a rush!
Moving onto the hair:
I chose curly hair, but you could easily leave your ribbon straight for straight hair, and it will look just as cute! My daughter has curly hair, so I thought the curls for a special touch.
For instructions on curling ribbon, please visit here.
For the hair, you can make it as short or as long as you want. Just play with the length. Remember you will wrapping the "hair" across the head, so that will take away some of the length.
My curled ribbon pieces were roughly 5.5" pieces. Some longer, some shorter. I made about 10 of these, so it all depending on who they were for and the age of the girl.
To attach the hair, place a decent amount of hot glue on the top of the head. Tip: If your unsure of where the placement of the hat will be, it's best to glue more towards the back than front, as the front is on display.
Press the "hair" onto the "head" and hold for a few seconds.
Now for the hat! I adore the hat!!
My hats came in a six pack, which was perfect for this project.
Just add glue to the crown of the head, then a small amount around the rim of your Santa hat
Using your skewer, allow it to assist you in adding the hat to the elf's head without getting glue everywhere.
Here's a side by side.
I did reverse sides for the tassel, so if you had them in pigtails, it would be uniform.
For the feet...Cut a small square, and then clip one corner at an angle for the shoe, and heat seal. Watch your fingers, so you don't burn yourself!
If you'd like; Sew on a mini jingle bell on each foot and viola...
One cute, cute, cute, little elf!
How will you elf yourself?


No comments:
Post a Comment