Pages

Tuesday, October 16, 2012

Kid Approved Egg Pizza!

Do you have a hard time getting your child to eat breakfast in the morning?  If so, these Egg Pizza's are sure you become a winner in your household!  Mom's Happy.  Kids are Happy.  I love when it all comes together like that!

To start;

You'll Need:
2 eggs
veggies of choice *Optional
salt
half n' half or milk
ham (or other meat) *Optional
Shredded Cheese

To begin, crack your eggs, add salt, and a splash of milk or half n' half, like you normally would for scrambled eggs.
 Whisk together, pour into skillet that has been warmed on Medium heat, and add your vegetables.  We just added scallions.
 Top with ham to cover the surface.
 Allow the eggs to cook until set.  See below, how I can easily grab the egg with my spatula?
 Flip to cook on opposite side for just a minute.  Doesn't take long.  Then cut into "pizza's" with a pizza cutter and serve with fruit and/or yogurt. 
They'll gobble it up!


Friday, October 12, 2012

Cowboy Elmo's Mac & Cheese

My husband has had to take a couple business trips over the last few months, so it's just been me and the kiddo to fend for ourselves at dinnertime.  Are you with me when I say it seems harder to cook for 2?  Word.

Anywho...My daughter got a Sesame Street Cookbook several weeks back, and I swear she will just sit there, and stare, looking at this thing for literally hours.  So...I decided it was time to make something out of it.  Can you guess what we found in there?

Cowboy Elmo's Mac & Cheese...

Elmo? Win.  Mac & Cheese? Win. 


To top it off, it only called for a few ingredients, so it was perfect!

You'll Need:
12 oz of Elbow Macaroni
8 slices of American Cheese
1/4c. Milk
2 Tbsp of Butter/Margarine
Salt

Boil your water, as you normally would.  Add pasta, stir, and cook per the directions on your box, stirring occasionally.   Not to promote companies all the time, but American Beauty has a new 3 minute pasta.  Yep - It's awesome.  Check it out.

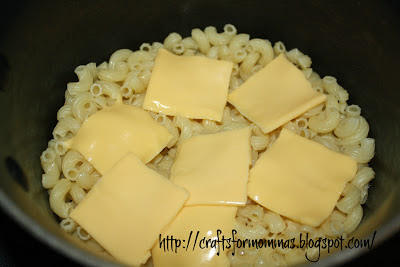
While the pasta is cooking, I quartered my cheese.
When the pasta timer chimes; Drain the water, and place your pan back on the stove.
Add butter.
Add cheese and stir until fully melted.  FYI:  I did mine in batches.
Spoon it up for your sweets, and ENJOY!

I have to say, it was actually really good with the addition of salt.

It heated up really well too, if you add a tiny touch of milk.  This was was surprising to me, because our household typically doesn't "DO" leftover mac n' cheese...

La-la-la-la, La-la-la-la, Elmo's World.... ;)


Thursday, October 11, 2012

Pistachio Fudge

Morning, Sweets!

Today I'm going to share a fudge recipe with you, but not any ol' fudge recipe.  Pistachio Fudge!
This recipe is great for fudge lovers who like creamy fudge.  It melts in your mouth!

I will say that to me, and one other person, we debated while consuming about 5 pieces of fudge each, as to whether or not it resembled a true pistachio taste.  Maybe it was because I didn't have almond extract, so subbed vanilla, but to about 10 other people, they thought this recipe was GREAT!  Some even asked to take some home to pack it in their lunch!! 

So...if you're a fudge lover...let's dive on in...

You'll Need:
1lb of white chocolate chips
8oz of cream cheese, softened
3c. powdered sugar
1/2 tsp. vanilla extract
1/2 tsp. almond extract
1/8 tsp. green food coloring
1/2c. chopped pistachios

To begin, lets go ahead and line our 8" pan with foil.  Make sure the foil hangs over the sides of the pan for easy transfer later on.
Spray the foil/pan with cooking spray, so the foil doesn't stick.
In a medium bowl, melt your white chocolate to the direction on your package.  I microwave 30 seconds at a time, and stir well in between each 30 second interval. Once chocolate is melted.  Sit aside.
After 30 seconds

After 1 minute, 15 seconds. Just keep stiring instead of re-heating.  You'll see it makes a difference.

Set up your mixer, and mix cream cheese until smooth. 
Once smooth, you'll slowly add in your sugar until its well combined. Make sure you scrap the sides of your bowl to incorporate all that sugar :)

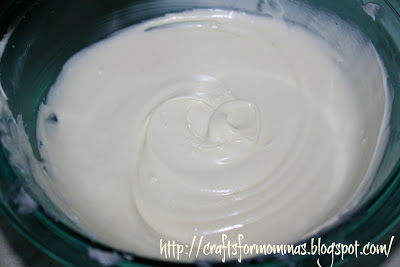
Add chocolate, extracts, food coloring, and mix well. With a spoon, fold in your pistachios.


Then spread into your foil ready pan, and chill overnight.
When it comes out.  It should look like this:
To remove the fudge, grab the foil "handles" and transfer onto a cutting board.  I flipped mine upside down, so I would have a flat surface to cut on, then wiped the excess cooking spray off with a paper towel.
With a large, sharp knife, cut the fudge into the desired size pieces.  The original recipe calls for something like 16 pieces.  I was able to cut about 42.  I wanted ours bite size, which with the thickness, still ended up being 2-3 bitters.

So...can you settle our debate?  Was it pistachio enough for you??


Wednesday, October 10, 2012

Crock Pot Cube Steak and Gravy

When the weather starts to put off a nice chill, one of the 1st things I do is dig out my crock pot.

My crock pot and I, have always had a love/hate relationship.  I love the ease, but despise the clean up!  That is, until I found the infamous crock pot liners!!  Ever heard of them? 

This is not a paid advertisement, but it should be! These babies are fantastic!!  They cost about $3-4 (in my area), for 3 (maybe 4?) liners, and they are worth every penny!! 
 
So today, I'm going to show you a quick and easy recipe to get the spirit of fall rolling through your veins.

1st up - Cube Steak and Gravy.  Which I found over at The Post-It Place. The gravy in this recipe is soooo good.  We served over mashed potatoes to sop it all up, but I can see this being just as good over rice!

When the dinner bell rings, this is what you'll be serving:
 Are you hungry yet?  Thought so! ;)  Let's get started!


You'll Need:
2-3lbs of cube steak
2 cans of cream of soup (I used mushroom with roasted garlic)
1 envelope of onion soup mix
3/4c. water
salt/pepper to taste

For those of you that buy your meat at the grocery store, you'll be able to skip this step.
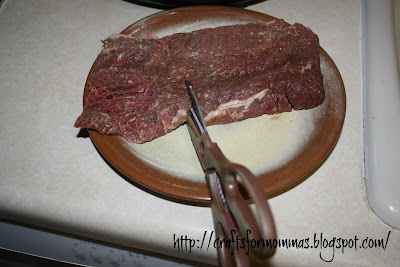
We buy from a local farmer, and the steaks are put into the package as a large steak. As you'll see below, cutting is an absolute cinch.  FYI: I prefer to cut up the steaks prior to cooking.
My kitchen sheers and I have a love-love relationship.  I use them for everything from opening vegetables packages, to snipping fresh herbs, to cutting meats.  If you don't have a pair.  Buy some.  TODAY!
Once your meat is cut, toss everything into the crock pot.
Cook on low for 6-8 hrs, or on high for 4.

Crock Potting It, Makes Me Happy!!!


Tuesday, October 9, 2012

Spider Hair Bow (Itsy Bitsy's too!)

Morning Y'all...How was your Monday?

Mine was great.  I'm kind of a odd duck, in that way. I actually enjoy Monday's.  It's a fresh start to the week - a clean slate!  This is weird to most - I know!! ;)

As a lot of you saw; Yesterday was our kick off to some fun Halloween crafts I have coming up...So, today, I just had to share this darling spider bow with you!! Aren't these guys just the cutest?!!


You won't want to miss out on this tutorial, so lets grab your supplies, and get ready!!!

Today...

You'll Need:
3/8" Black Grosgrain Ribbon
3/8" Red Grosgrain Ribbon
Googly Craft Eyes
Marabou
Scrap of felt fabric
Needle/Thread
Hot Glue Gun/Glue Sticks
Lighter
Clothespin

Got your supplies?  Okay, lets get started!

1st - You'll want to curl your black ribbon.  To do this, please follow the easy instructions here.

After you have taken your ribbon off the dowels, you will set 4 pieces of (~12") ribbon (per spider) off to the side.  If you are creating the baby version of these cuties, you will cut the ribbon into 3rd's, and will still need 3, 4" pieces...

After all pieces have been cut, take your lighter, and slightly run them along the ends of the ribbon, making sure not to catch them on fire!  It just takes a quick swipe.  This method heat seals the ends, so that the ribbon will not fray.

Next, we're going to build the base.  The Legs.

With your needle and coordinating thread, thread your needle.  You will need at least 18-24" of dangling thread to complete this project. (It is ok to knot the end of your thread - I typically triple knot it.)

Once you're needle is prepared; Hold the lower middle of the needle and measuring to the center of your ribbon piece (for instance if you're using a 12" piece, the center will be 6" and so on) and place the middle directly down into the needle.  
DO NOT PULL THE THREAD THROUGH AND DO NOT MOVE YOUR HAND!!!!!!!  In fact, you might as well get comfy, because you're going to be here for a short bit.


Repeat the above steps, for all 4 pieces, staggering as you add them to your needle.
Once all your pieces are positioned the way you want them, cinch them down on the needle, holding the needle still with your right hand, and finish feeding the needle all the way through the layers.

Feed the needle through without pulling it all the way through.  You may have to scrunch your ribbon together to see the needle.


Pull the thread tightly, then feed the thread back through - going the opposite direction. So your sewing the middle together...
Continue sewing until the body is firmly supported.
Once you have finished sewing; Your body should look like this:


Before we move onto the body, now is a good time to plug in your hot glue gun.

Moving onto the body...

For the body, I used marabou.  Ever heard of it?  It's this lovely frizzy mess of fun that they make boa's out of! 

For the large spiders, measure out 5" of marabou, for the small, measure out 3".

Large Spider
Itsy Bitsy Spider
Now it's time to grab your scrap piece of fabric.  It doesn't need to be very large.  

Fold your cut marabou piece in half, so the ends are together.  On top of a scrap piece of paper, place a small amount of glue on your scrap fabric, and place the marabou ends into the glue, squeezing the scrap fabric sides up to get a good seal.
Make sure you pinch everything into the glue, so the pieces seal together.  
If you have questions, feel free to ask!
This is what the backside of your body should look like:
To continue gluing the body, you'll separate the middle of the body, and put a small amount of glue on the lower piece (where my thumb is). 
Using a clothespin or other object, press the marabou together for a few seconds so it can dry. 

Okay...so, now it's time to piece the body and legs together:

Place a small amount of glue on the lower middle of the body, then place the body on top, and firmly press into place.  I use a clothespin to speed things along.

By the way...I do not recommend using your hands here.  
Trust me...When I say "You'll burn yourself" :)
Let the hot glue dry for about 30 seconds, then place on your googly eyes...

This is what your spiders should look like...

Large:


Itsy Bitsy:

Scary little critters, aren't they?! 

Now...IF you know me, you know I'm all about the bling and the bows, so how could any spidey gal go without a bow herself? My thoughts exactly!

For the itsy bitsy hair bows:

Measure 5" of another color of ribbon.  I used red ribbon to mimic a black widow.  OoOoOOo...Scary! ;)
Don't forget to heat seal your ends.  
Now, thread your needle and thread.  Once again in coordinating colors.  You'll want approximately 10-12" hanging from your needle.  Go ahead and snip the thread, and tie into a double knot.  Sit aside.

Take your ribbon and fold the ends to cross each other.  
Holding the middle into place, take the top loop and press it into the back side of the bow to create a smaller bow.  
With your needle and thread, sew the center of the bow, going through the front and the back at least twice, then in a winding clockwise motion, spin the thread around the bow to create a complete center.  Once you get to having about 3" of thread left, go back through the front center of the bow.
Now, you'll need to turn your bow around and snip the thread that's attached to the needle, and double knot.

With your hot glue, put a small amount on the backside of your bow and attach to the spider, by pressing firmly into place for a few seconds.
All you have left to do is attach your alligator clip. 
This is what you're finished product(s) should look like:


Here is one of my friends daughter, sporting the Itsy Bitsy Spider.  
She is absolutely precious!!

 Oh Happy Day!