Pages

Showing posts with label Beauty/Hair/Nails. Show all posts

Tuesday, September 24, 2013

Hair Bow Hairstyle for Toddlers (And Adults!) Tips & Tricks


I adore these hair bow hair styles!

This one was brought to my attention by a fellow Crafty Momma and good friend of mine.  She was just randomly showing me her daughters hair a few weeks back and I L.O.V.E.D - Loved it! 

We've all seen these styles creeping all over PIN by now, but what I loved about this tutorial in particular was that it's geared towards toddlers and did not use bobby pins.  Not a single one.

SCORE!!!

After seeing her daughters pictures, my newest mission in life was try this on my dotting daughter.

You see...She USED to let me play and brush her hair all the time, (when she didn't have hair!), and now that she has a head full of it, she runs for the hills anytime she catches sight of me with the brush. *Sigh*

That being said alone, should tell you just how easy this is!!  Wee...

So here is the tutorial we used, along with some additional tips and tricks provided by me.

I (mostly) used this tutorial here and for the most part I was really happy with it.

What didn't work for us:
Using 3 rubber bands.
Again, my daughter does not like to sit still and have her hair messed with, so I felt fortunate to get the second one in!

What we did?
Just split the looped ponytail hair (as she shows) then wrapped the hair over the middle (for the bow affect) and then tied the second rubber band around as you normally would for a ponytail.

For the extra hair that we had left, I just tucked it into the second band.  Super easy!!

That being said (I also didn't leave out near the amount of hair she did for the middle bow piece.
That's also why our "bow" is bigger and fuller.

What I will try in the future?
Remember those old school Ponytail Holders?
You know, the ones with the balls on the ends, where you wrap them and them loop one of the balls over the other to secure it.
I would use those for the 2nd step!
When your bow is as full as I made mine, it took some finesse to get the 2nd rubber band around it.
Wasn't a deal breaker, but I do like to keep things simple and this seems like a great remedy!
*Cheers* Use Me!  Use Me!

Last comment I wanted to give - 
We started out with dry hair.
This works for some and not for others.
Just stick to what you normally do during your hair routine and you'll be just fine!

Here, my friends, is what I like to call our "Masterpiece"!


She's just as cute and sassy as ever...and her poses as of late - ADORBS!
Bike - Check.
Baby - Check.
Shades - Check.
Purse - Check.

This buttercup of mine is all G.I.R.L
And she's mine.
All mine.
*Smiles*


Monday, January 7, 2013

Cool People Care

I saw this message floating around and I thought it was quite appropriate for all of those trying to make themselves anew for the new year. 


So, what resolutions did you make for yourself this year?  Did you take the plunge?

I personally used to never make resolutions.  That is until my daughter came along.  
Since then, I seem to always make some type of resolution that has to do with self improvement.  They're mostly along the lines of...
 - Don't be so hard on yourself.  You're doing the best you can! Don't take others 2 cents to heart.  YOUR opinion and beliefs matter most!!
- Organize, Organize, Organize!  It is absolutely insane how much beautiful chaos (especially Toys and Clothes!) enters the household once you have a child.  I feel I'm always swiping out clothes sizes and trying to find a new spot for the grand toy item of the week.

This year, I'm going to continue my 1st two resolutions, as I have for the past 2 years.  

I still battle with the "Don't be so hard on yourself"  I think every Mother comes across this at some point in time.  We all only want what's best for our children and sometimes it can be an inner battle with yourself.  Am I doing the right thing?  What would my Mom have done? Was I too hard on her/him/them?

Organize!  Good grief.  I think this *might* be the year I let go.  My daughter is 2.5 and I still have EVERYTHING from her baby years.  Clothes, sippy cups, bottles, shoes, bibs, blankets, toys, you name it.  Instead of hoarding these things in my basement, why not give them away to someone who can really use them.  Again, this is an inner battle with myself, but I'm going to try.  I always go back n' forth on "Well what if we have another...then I have to start all over" but ya know...if and when we do have another, they will get a fresh start.  Besides, if we have a boy next go round, he wouldn't exactly look like the hunky bubby he should in a frilly pink dress.  Just sayin'. 

This years resolution is to print more pictures and put them in photo albums.  I have a MASSIVE photo storage outlet, thanks to Shutterfly, but sometimes it's nice to flip through a book to see and feel those memories again.  Part 2, is to keep recreating memories.  I feel I have done a very good job with this, thus far, but I want to instil the importance of travel, the earth, and culture into my daughters veins.  The world is a beautiful thing.  Why not start with our own city?!  Yep.

So go ahead and share with me your tips, tricks, and resolutions.  2013 is going to be a great year! 

All aboard!


Friday, December 21, 2012

Elf Yourself Bow

Sometimes I surprise myself when I sit down to make my bow creations.  I'm not saying that in a braggish sort of way.  Just in a way, that you never really know how good (or bad!) something is going to turn out until it's finished, and I'm pleasantly surprised with these. :)

So far, this is the only bow (outside of Santa) that my daughter begs to wear.  She has 2, one for each piggy tail, and she named her elves Judy and Emily.  :)

To start on your darlings bows;

You'll Need:
3/8" Grosgrain Cream Ribbon
3/8" Grosgrain White Ribbon
3/8" Grosgrain Green Ribbon
3/8" Grosgrain Red Ribbon
3/8" Grosgrain Ribbon in the color of hair you'd like to use.  I was making multiple ribbons for the girls in my life, some were blonde (gold) and others brunette (chocolate brown).
Tiny Santa Hats (found mine at Hobby Lobby)
Mini Jingle Bells, Optional
Puff Paint, Optional
Scissors
Lighter (to seal)
Wooden Skewer, optional


To begin, as always plug in your glue gun, so it's hot and ready when you are.

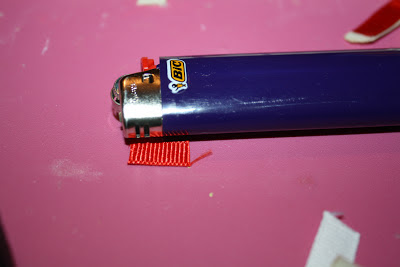
Next, cut 3.75" of your cream ribbon for the body.  Since my daughter was "helping" me make these, these are all guestimation on measurements, but they're all pretty close, I'd say.  Below you'll see that I use my lighter as a reference, so you can see 1st hand what it should look like.
 
Heat seal your ends.

Next, we'll create the face of your elf.  It's simple enough.  Just wrap the ribbon around your finger or thumb to create a loop. 
Place a small amount of glue where you want to secure the face and sit aside.

Now, we'll move onto the arms.  Cut 3.25" of your cream ribbon, and heat seal the ends.
Fold the "arms" at an angle, and seal with glue in the middle, so your image looks like this:
Then top and glue the body
Cut red ribbon to size for sleeves and heat seal the ends
Just like you did for the arms, fold the shirt at an angle, and seal with glue in the middle, so your image looks like this:
 Attach the sleeves to the arms with glue
Cut and seal the middle of your shirt:
Attach to the middle of the shirt:
Let's move onto the skirt...Created 3 loops.  You'll start with a "V", and make one loop directly in the middle.  Then attach your skirt to the body directly under the shirt.
Cut 2 pieces of white ribbon for the legs approximately 2.5" each and heat seal.
 
So they resemble legs, I cross them a bit at the top and seal with glue before attaching the "legs" to the "body".
 To attach the pieces, flip over the body, and attach to backside


Moving onto the tights.
 I couldn't find candy cane striped ribbon in the uniform I wanted, so I opted to use puff paint.  I love how it brought a different texture to the bow, and overall it turned out really great.  

When working with puff paint, allow your paint to fully dry before moving forward with your bow.  I highly recommend overnight.

Another thought, is to use a sharpie if you're in a rush!
 
Moving onto the hair:
I chose curly hair, but you could easily leave your ribbon straight for straight hair, and it will look just as cute!  My daughter has curly hair, so I thought the curls for a special touch.

For instructions on curling ribbon, please visit here

For the hair, you can make it as short or as long as you want.  Just play with the length.  Remember you will wrapping the "hair" across the head, so that will take away some of the length.

My curled ribbon pieces were roughly 5.5" pieces.  Some longer, some shorter.  I made about 10 of these, so it all depending on who they were for and the age of the girl.

To attach the hair, place a decent amount of hot glue on the top of the head.  Tip: If your unsure of where the placement of the hat will be, it's best to glue more towards the back than front, as the front is on display.

Press the "hair" onto the "head" and hold for a few seconds.


Now for the hat!  I adore the hat!!
My hats came in a six pack, which was perfect for this project.  
Just add glue to the crown of the head, then a small amount around the rim of your Santa hat


Using your skewer, allow it to assist you in adding the hat to the elf's head without getting glue everywhere.


Here's a side by side.  
I did reverse sides for the tassel, so if you had them in pigtails, it would be uniform. 
For the feet...Cut a small square, and then clip one corner at an angle for the shoe, and heat seal.  Watch your fingers, so you don't burn yourself!
 If you'd like; Sew on a mini jingle bell on each foot and viola...
One cute, cute, cute, little elf!
How will you elf yourself?


Tuesday, October 9, 2012

Spider Hair Bow (Itsy Bitsy's too!)

Morning Y'all...How was your Monday?

Mine was great.  I'm kind of a odd duck, in that way. I actually enjoy Monday's.  It's a fresh start to the week - a clean slate!  This is weird to most - I know!! ;)

As a lot of you saw; Yesterday was our kick off to some fun Halloween crafts I have coming up...So, today, I just had to share this darling spider bow with you!! Aren't these guys just the cutest?!!


You won't want to miss out on this tutorial, so lets grab your supplies, and get ready!!!

Today...

You'll Need:
3/8" Black Grosgrain Ribbon
3/8" Red Grosgrain Ribbon
Googly Craft Eyes
Marabou
Scrap of felt fabric
Needle/Thread
Hot Glue Gun/Glue Sticks
Lighter
Clothespin

Got your supplies?  Okay, lets get started!

1st - You'll want to curl your black ribbon.  To do this, please follow the easy instructions here.

After you have taken your ribbon off the dowels, you will set 4 pieces of (~12") ribbon (per spider) off to the side.  If you are creating the baby version of these cuties, you will cut the ribbon into 3rd's, and will still need 3, 4" pieces...

After all pieces have been cut, take your lighter, and slightly run them along the ends of the ribbon, making sure not to catch them on fire!  It just takes a quick swipe.  This method heat seals the ends, so that the ribbon will not fray.

Next, we're going to build the base.  The Legs.

With your needle and coordinating thread, thread your needle.  You will need at least 18-24" of dangling thread to complete this project. (It is ok to knot the end of your thread - I typically triple knot it.)

Once you're needle is prepared; Hold the lower middle of the needle and measuring to the center of your ribbon piece (for instance if you're using a 12" piece, the center will be 6" and so on) and place the middle directly down into the needle.  
DO NOT PULL THE THREAD THROUGH AND DO NOT MOVE YOUR HAND!!!!!!!  In fact, you might as well get comfy, because you're going to be here for a short bit.


Repeat the above steps, for all 4 pieces, staggering as you add them to your needle.
Once all your pieces are positioned the way you want them, cinch them down on the needle, holding the needle still with your right hand, and finish feeding the needle all the way through the layers.

Feed the needle through without pulling it all the way through.  You may have to scrunch your ribbon together to see the needle.


Pull the thread tightly, then feed the thread back through - going the opposite direction. So your sewing the middle together...
Continue sewing until the body is firmly supported.
Once you have finished sewing; Your body should look like this:


Before we move onto the body, now is a good time to plug in your hot glue gun.

Moving onto the body...

For the body, I used marabou.  Ever heard of it?  It's this lovely frizzy mess of fun that they make boa's out of! 

For the large spiders, measure out 5" of marabou, for the small, measure out 3".

Large Spider
Itsy Bitsy Spider
Now it's time to grab your scrap piece of fabric.  It doesn't need to be very large.  

Fold your cut marabou piece in half, so the ends are together.  On top of a scrap piece of paper, place a small amount of glue on your scrap fabric, and place the marabou ends into the glue, squeezing the scrap fabric sides up to get a good seal.
Make sure you pinch everything into the glue, so the pieces seal together.  
If you have questions, feel free to ask!
This is what the backside of your body should look like:
To continue gluing the body, you'll separate the middle of the body, and put a small amount of glue on the lower piece (where my thumb is). 
Using a clothespin or other object, press the marabou together for a few seconds so it can dry. 

Okay...so, now it's time to piece the body and legs together:

Place a small amount of glue on the lower middle of the body, then place the body on top, and firmly press into place.  I use a clothespin to speed things along.

By the way...I do not recommend using your hands here.  
Trust me...When I say "You'll burn yourself" :)
Let the hot glue dry for about 30 seconds, then place on your googly eyes...

This is what your spiders should look like...

Large:


Itsy Bitsy:

Scary little critters, aren't they?! 

Now...IF you know me, you know I'm all about the bling and the bows, so how could any spidey gal go without a bow herself? My thoughts exactly!

For the itsy bitsy hair bows:

Measure 5" of another color of ribbon.  I used red ribbon to mimic a black widow.  OoOoOOo...Scary! ;)
Don't forget to heat seal your ends.  
Now, thread your needle and thread.  Once again in coordinating colors.  You'll want approximately 10-12" hanging from your needle.  Go ahead and snip the thread, and tie into a double knot.  Sit aside.

Take your ribbon and fold the ends to cross each other.  
Holding the middle into place, take the top loop and press it into the back side of the bow to create a smaller bow.  
With your needle and thread, sew the center of the bow, going through the front and the back at least twice, then in a winding clockwise motion, spin the thread around the bow to create a complete center.  Once you get to having about 3" of thread left, go back through the front center of the bow.
Now, you'll need to turn your bow around and snip the thread that's attached to the needle, and double knot.

With your hot glue, put a small amount on the backside of your bow and attach to the spider, by pressing firmly into place for a few seconds.
All you have left to do is attach your alligator clip. 
This is what you're finished product(s) should look like:


Here is one of my friends daughter, sporting the Itsy Bitsy Spider.  
She is absolutely precious!!

 Oh Happy Day!