I found this awesome tutorial through Pinterest! She has a lot of wonderful and helpful information, but with me not being a seamstress, I ended up reverting back to my bow making ways. For me, I found it to be easier and maybe even a little faster, so maybe you'll find this tid bit of information suitable for you too.
If you have a little boy, this project is sure to be up your alley, so please don't forget to check out her page!
Let's get started!
You'll Need:
1/4 yard of fabric
small piece of soft fleece
sew on velcro
thread
sewing machine
needle
scissors or rotary cutter
cutting mat
To get started, lets cut all your pieces. You'll need:
-2, 3" x 10" pieces of fabric
-1, 3" x 10" piece fleece
-1" piece velcro
-1, 2.5" x 4"(for the middle of the bow tie)
-1, 3" x 13" strip, depending on your child's neck size. The one I'm making is for a two and a half year old. Tip: To measure your child's neck; Measure with a shirt on, and go under the colar for a true measurement and add 2". You can use elastic in place of this piece, but with ours being so formal, I wanted it all to match.
Take your 3, 3" x 10" strips, placing the right sides together of the fabric and the felt on top of that.
Sew around the edges of your fabric, leaving a 2" opening. This is where i got a little carried away. I ended up having maybe a 1.5" opening. That's what I get for not paying attention!
Now you'll turn the fabric inside out. *Make sure that the fleece goes on the inside* I had a hard time with this, being that I had a smaller opening. I ended up using a metal skewer and a pair of scissors, and this was by far the most tedious part of the whole process. Hey...just being honest...
A quick note: If you're using delicate fabric like I was, I would use your scissors (or whatever you're flipping the fabric with) on the fleece side. You don't want anything to happen to your pretty fabric. That would be devastating!
Your piece should look something like this:
This is when my bow making skills kicked in. 1st, Thread a needle with coordinating thread, (you'll need at least 36" of thread) and sit aside. Now, take your sewn piece and lay it flat. Don't be afraid to smash it flat to get it completely straight. In the middle, you're going to place your index finger and thumb, on the top and bottom of the sewn material and pinch it together...
With your needle and thread, create a box shape. Doesn't have to be pretty or perfect. It's going to be covered up later on.
Now go directly through the backside and in a clock-wise motion, wind the thread directly around the center of the bow tie.
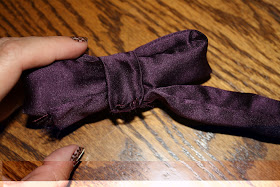
It should look like this:
The more you go around, the tighter you'll cinch it...
Now place the needled directly in the front center of the bow and move it towards the back, then back through the front, and through the back again.
(Keeping in mind you still haven't cut anything - Thread should still be attached to needle)
Sew middle pieces together, making sure not to go through the bow tie itself, as you still have your neck strap to put through.
Tuck your neck strap through...Scissors help here...
And now it's time to sew on your velcor. Make sure you do opposites sides, so it closes correctly!
There ya go...One perfect bow tie!
A quick note: If you're using delicate fabric like I was, I would use your scissors (or whatever you're flipping the fabric with) on the fleece side. You don't want anything to happen to your pretty fabric. That would be devastating!
Once the fabric is flipped, take your open end of the fabric and tuck in the lose ends.
Pinching the two ends together, you're going to sew a zig zag seam to connect the two pieces together.
Your piece should look something like this:
This is when my bow making skills kicked in. 1st, Thread a needle with coordinating thread, (you'll need at least 36" of thread) and sit aside. Now, take your sewn piece and lay it flat. Don't be afraid to smash it flat to get it completely straight. In the middle, you're going to place your index finger and thumb, on the top and bottom of the sewn material and pinch it together...
With your needle and thread, create a box shape. Doesn't have to be pretty or perfect. It's going to be covered up later on.
Now go directly through the backside and in a clock-wise motion, wind the thread directly around the center of the bow tie.
It should look like this:
The more you go around, the tighter you'll cinch it...
Now place the needled directly in the front center of the bow and move it towards the back, then back through the front, and through the back again.
(Keeping in mind you still haven't cut anything - Thread should still be attached to needle)
Now find your 1, 2.5" x 4" piece, for the middle of the bow tie...Folding both sides in so there are no frays, like this:
With the middle piece, wrap it around the bow tie.
Tuck your neck strap through...Scissors help here...
And now it's time to sew on your velcor. Make sure you do opposites sides, so it closes correctly!
There ya go...One perfect bow tie!


No comments:
Post a Comment